In the previous post, we’ve successfully launched KGDB on BeagleBoard. Now we need to execute GDB with BeagleBoard’s symbol table and and remote connect to KGDB on BeagleBoard.
1. Go to the folder we built arm-angstrom-linux-gnueabi-gdb and type:
./arm-angstrom-linux-gnueabi-gdb [path to vmlinux file]
silentlain 發表在 痞客邦 留言(1) 人氣()
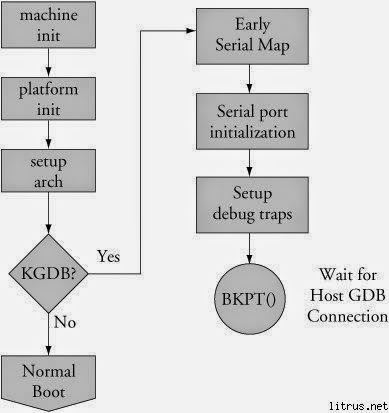
Now all the files are ready. We need to boot BeagleBoard to KGDB. How?
Here’s the flow chart for KGDB:
silentlain 發表在 痞客邦 留言(0) 人氣()
In this post I will address GDB on the PC side.
GDB comes preinstalled with most Linux distributions. You can definitely find one in your PC. However, these GDBs are not what we need here. We need a GDB that runs on PC (x86, x86-64) but can debug ARM architecture. Therefore we need to build it. Fortunately, OpenEmbedded already has pre-written recipes for it. All we need to do is type the following commands:
source ~/.oe/environment-angstromv2012.05
silentlain 發表在 痞客邦 留言(0) 人氣()
In this post I will show how to enable KGDB in Angstrom.
In order to enable KGDB, we need to modify kernel configurations and rebuild the kernel. For desktop Linux distributions, we can do this by make menuconfig. In Angstrom, it’s similar. We only need to replace the make command by bitbake command and setup its environment. Here are the steps:
1. source ~/.oe/environment-angstromv2012.05
silentlain 發表在 痞客邦 留言(0) 人氣()
Generally speaking there are two ways to do kernel debugging in Angstrom:
1. Using KGDB as a remote GDB agent.
2. Using a hardware JTAG to control the processor.
silentlain 發表在 痞客邦 留言(0) 人氣()
In the previous post, we successfully built a Angstrom kernel and kept all the source code. In this post we’ll learn how to modify the source code and rebuild it.
First we need to locate the source code. Since we’ve commented out INHERIT += "rm_work" in conf/local.conf, it should be kept somewhere on our hard disk. It is located at setup-scripts/build/tmp-angstrom_v2012_05-eglibc/work/beagleboard-angstrom-linux-gnueabi/linux-mainline-3.2.28-r122a/git/ . If you open this folder, you will see the complete kernel source tree here. Let’s try a simple example:
1. Go to source tree folder and use text editor to open /kernel/fork.c.
silentlain 發表在 痞客邦 留言(0) 人氣()
So now we know how to build and run the distribution we made ourselves. But how do we modify it? How do we modify the source code and rebuild it? This serious of posts will guide you through it.
This method of kernel modification is based on bitbake scripts from github that described in previous posts. If you haven’t done it, please finish it first.
1. Install necessary packages. Since we’ve already installed a bunch of packages, right now we only need git-core. Simply type “sudo apt-get install git-core” will do the job.
silentlain 發表在 痞客邦 留言(0) 人氣()
If you followed the last post and booted the BeagleBoard successfully, congratulations! This post is irrelevant to you. However, if you followed all the instructions and still failed, this is the post you’re looking for.
Scenario 1:
Build parameter: systemd-gnome-image
silentlain 發表在 痞客邦 留言(0) 人氣()
After finishing previous post on “How to build your own Angstrom distribution”, now we should have everything ready. We just need to put files to micro SD card and it should boot.
1. Download this file and format microSD using it. The microSD card must be at least 4 GB. This process will PERMANENTLY delete the contents! Please backup your micro SD card first.
1.a: In terminal, type "sudo fdisk -l" to know which sdX is microSD card mounted.
silentlain 發表在 痞客邦 留言(0) 人氣()
Angstrom distribution uses bitbake to build the entire distribution. There are 2 parameters for speeding up bitbake:
PARALLEL_MAKE: this is passed to make so setting it to “-j X” is handy (where value of X depends on number of CPU cores)
BB_NUMBER_THREADS: amount of bitBake threads used to run tasks such as do_fetch, do_configure, do_compile etc. Do not set too big value or machine will melt and you will loose control over it ;)
silentlain 發表在 痞客邦 留言(0) 人氣()
1. Install required software and configure environment.
1.a: sudo apt-get install git help2man gawk texi2html texinfo build-essential unzip diffstat subversion texinfo cvs chrpath
1.b: Reconfigure dash: sudo dpkg-reconfigure dash, select no
silentlain 發表在 痞客邦 留言(0) 人氣()
What's the boot sequence of BeagleBoard xM?
Since there’s no NAND or NOR flash on xM, after power on, it directly boots from MMC/SD card. The boot sequence is as follows:
1. Power on
silentlain 發表在 痞客邦 留言(0) 人氣()
1. Unbox and connect the board to RS232 (COM) port. Here I’m using FTDI USB serial adaptor. Do not plug in the power yet.
silentlain 發表在 痞客邦 留言(1) 人氣()